


วิธีการชำระเงิน Show ก่อนการชำระค่าสินค้าโปรดติดต่อทางร้านเพื่อเช็คราคาค่าขนส่งก่อน หากชำระเงินค่าสินค้าแล้วกรุณาส่งรายละเอียดในการชำระเงินให้ หจก.ออฟฟิสโปรแอนด์แฟคตอรี่สเตชั่นมาร์ท โดยยืนยันการ ชำระเงิน ดังนี้. E-mail : Fax.038-021552 Line Id: tumofficepro ชำระเงินผ่านธนาคาร ชำระเงินออนไลน์
โทรศัพท์ สีขาว Panasonic KX-TS500MXW รหัสสินค้า : จำหน่ายโดย ร่วมรายการผ่อน 0%  The1 0% 3 เดือน (เมื่อช้อปครบ 1500.-) โทรศัพท์ Panasonic KX-TS500MXW ปรับระดับเสียงกริ่งได้ 3 ระดับ ปรับระดับเสียงสนทนา 6 ระดับ โทรทวนซ้ำหมายเลขโทรออกล่าสุดได้ง่าย หมดปัญหาลืมจดเบอร์โทรศัพท์ มาพร้อมปุ่ม Flash สำหรับรับสายเรียกซ้อนหรือโอนสายกรณีใช้งานกับตู้สาขา สามารถติดกับผนังเพื่อให้ใช้งานง่าย ตามจุดทั่วบ้าน หรือ สำนักงาน โทรศัพท์ Panasonic KX-TS500MXW ปรับระดับเสียงกริ่งได้ 3 ระดับ ปรับระดับเสียงสนทนา 6 ระดับ โทรทวนซ้ำหมายเลขโทรออกล่าสุดได้ง่าย หมดปัญหาลืมจดเบอร์โทรศัพท์ มาพร้อมปุ่ม Flash สำหรับรับสายเรียกซ้อนหรือโอนสายกรณีใช้งานกับตู้สาขา สามารถติดกับผนังเพื่อให้ใช้งานง่าย ตามจุดทั่วบ้าน หรือ สำนักงาน
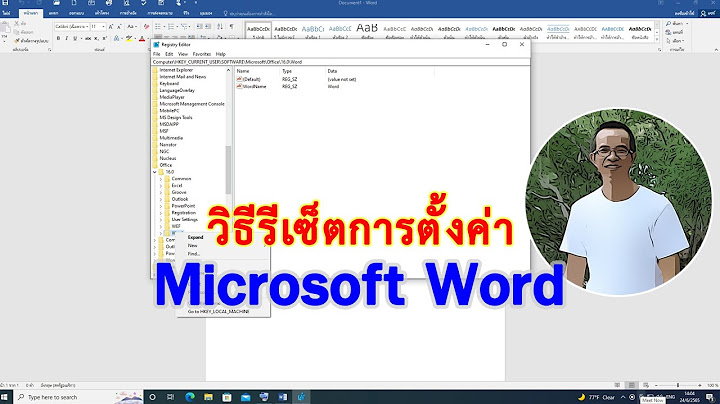
1 Getting Started1-A Location of controls4 Things You Should Know1-B Settings4-A Wall Mounting4-B Troubleshooting2 A BC 3 DEF 1 5 JKL 6 MNO 4 GHI 8 TUV 9 W XYZ 7 PQRS 0 T ONE FLASH REDIAL VOLUME ($) (TONE) Button (3-B) (FLASH) Button (3-A) RINGER Selector (1-B) (REDIAL) Button (2-A) DIALING MODE Selector (1-B) VOLUME (^), (_) Buttons (2-A) 1Connect the telephone line cord (1). 2Connect the handset cord (2), then confirm the dial tone.To Single-Line Telephone Jack Handset Cord Handset Telephone Line Cord RINGER Selector DIALING MODE Selector 1 2 1 When the unit rings, lift the handset.2 When finished talking, hang up.3 Set the DIALING MODE selector to TONE.≥If you cannot dial, set to PULSE. 4 Set the RINGER selector to HIGH, LOW orOFF. (Ex. “LOW” is selected.)2-A Making Calls2-B Answering Calls1 Lift the handset.2 Dial a phone number.≥If you misdial, hang up and start again from step 1. 3 When finished talking, hang up.To redial the last number dialedLift the handset. ➡ Press (REDIAL).To adjust the receiver volume (6 levels)while talkingTo increase, press (^).To decrease, press (_).≥ After hanging up, the volume level will be saved. 2 Operation 3 Special Features3-A For Call Waiting Service UsersPress (FLASH) if you hear a call-waiting tonewhile talking.≥The first call is put on hold and you can answer the second call. ≥To return to the first caller, press (FLASH) again. 3-B Temporary Tone Dialing(For Rotary or Pulse Service Users)Press ($) (TONE) before entering accessnumbers which require tone dialing.≥The dialing mode changes to tone. You can enter numbers to access answering services, electronic banking services, etc. When you hang up, the mode will return to pulse. ≥Access numbers entered after pressing ($) (TONE) will not be included when redialing. 1 Press the tabs in the direction of the arrows(1), then remove the wall mounting adaptor(2).To Single-Line Telephone Jack Screws 8.3 cm Hooks Problem The unit does not work. The call cannot be connected even if you dialed correctly. The unit does not ring. Remedy≥Check the settings (1-B). ≥Check whether the DIALING MODE selector setting is correct or not (1-B). ≥The RINGER selector is set to OFF. Set to HIGH or LOW (1-B). 8.3 cmWall TemplateTake special care to follow the safety suggestions listed below. InstallationsEnvironment1) Do not use this unit near water—for example, near a bathtub, washbowl, sink, etc. Damp basements should also be avoided. 2) The unit should be kept away from heat sources such as radiators, kitchen range, etc. It also should not be placed in rooms where the temperature is less than 5oC or greater than 40oC. Placement1) Do not place heavy objects on top of this unit. 2) Care should be taken so that objects do not fall onto, and liquids are not spilled into, the unit. Do not subject this unit to excessive smoke, dust, mechanical vibration or shock. 3) Place the unit on a flat surface. WARNING:TO PREVENT FIRE OR SHOCK HAZARD, DO NOT EXPOSE THIS PRODUCT TO RAIN OR ANY TYPE OF MOISTURE. PQQX13679XA F0403-2073 DManufactured by Panasonic Communications (Malaysia) Sdn. Bhd. Senai MalaysiaIf trouble occurs, disconnect the unit from the telephone line and connect to a known working phone. If the known working phone operates properly, do not reconnect the unit until the trouble has been repaired. If the known working phone does not operate properly, consult your telephone company. For your future referenceSerial No.(found on the bottom of the unit) Date of purchaseName and address of dealerIntegrated Telephone SystemOperating InstructionsModel No. KX-TS500MXPulse-or-tone dialing capabilityPLEASE READ BEFORE USE AND SAVE.∑Handset. . . . . . . one ∑Handset Cord. . . one ∑Telephone Line Cord . . . . . . . . . . . . . one Accessories (included)4-C Safety Instructions≥When set to OFF, the unit will not ring.3 Install screws using the wall templatebelow. Connect the telephone line cord.Mount the unit, then slide down.≥Fasten the cord to prevent it from being disconnected. 2 Tuck the telephone line cord inside the wallmounting adaptor, and push it in thedirection of the arrow (1and 2). ≥The word “UP WALL” should face upward. KX-TS500MXW 4-D SpecificationsPower Source:From telephone line Dimensions (H x W x D): Approx. 96 mm x 150 mm x 200 mm Mass (Weight):Approx. 475 g Dialing Mode:Tone (DTMF)/Pulse Operating Environment:5°C–40°C Specifications are subject to change without notice. PQQX13679XA 03.7.1 5:38 PM ページ 1 |

คู่มือ การใช้งาน โทรศัพท์ Panasonic KX TS500MXW
กระทู้ที่เกี่ยวข้อง


ลิขสิทธิ์ © 2024 th.frojeostern Inc.